Author Topic: SRX400 projects - progress  (Read 1891 times)

guest1378

  • Guest
SRX400 projects - progress
« on: July 27, 2013, 07:16:39 PM »
Following on from this topic : http://www.thumperclub.com/smf/index.php?topic=6588.msg43681#msg43681

When I said the tank appeared to be in nice condition, I was soon to find out that appearances can be deceptive.  I spent a day transferring the black mudguards and tank from the project bike on to my original runner so that I could still use the bike while my tank was being repaired.  With all the black parts fitted, I happily filled the tank up with petrol and thought I was all set to go for a ride the next day.

When I looked at the bike the next day, all the petrol had vanished ! On removing the tank, I found that the recently applied paint had started to bubble.   Further investigation revealed several holes rusted through the bottom of the tank.

Hmm, so that was two tanks in need of repair then !

Ian had put me in touch with his very clever friend who sorted out the tanks on his lovely bikes, so I delivered both tanks to him to have a look at and to work his magic.  It turned out that the first tank, the one I had dented, was already in worse condition than the sieve-like one and had filler all over the place.  It was looking like a bit of a challenge ! Anyway, I left them in his expert hands and those of his welder friend and hoped for the best.

This was the dent in the tank (I dropped it in a bollard while attempting to kick-start with the bike in gear...):


Yesterday, I collected  the finished results:


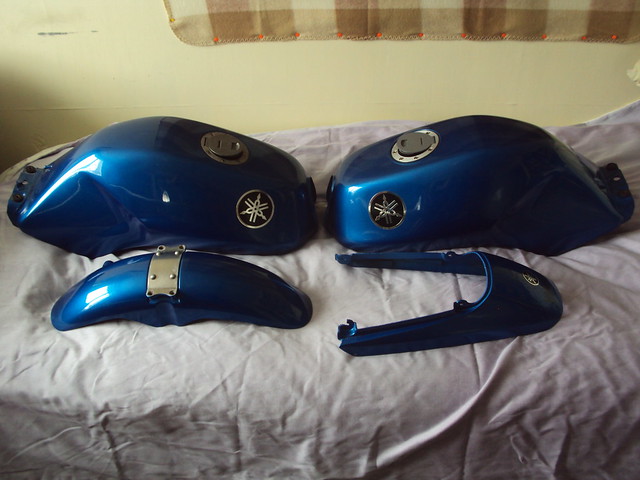
These are clearly far too smart for either of my bikes so some tidying up is needed.  On the downside, the MOT expired on the day I got the tanks back and I don't have any spare dosh at all as OH is out of work again  :(

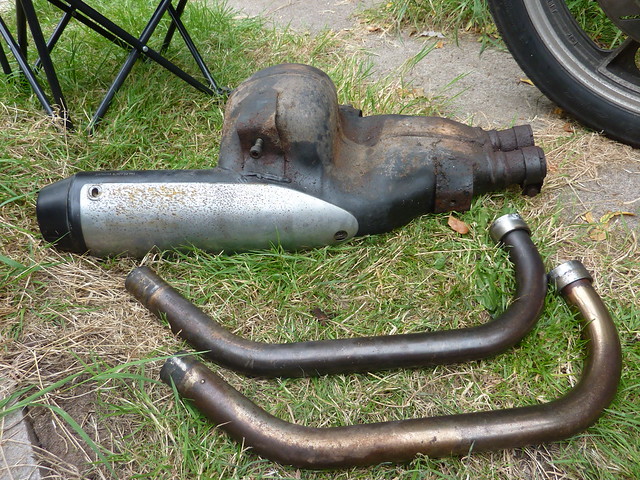
Last year I was told off a little for my noisy exhausts so I decided to investigate the exhaust on the project bike, which turned out to have the original standard Yamaha system.  After liberally squirting all the rusty fasteners with WD40, they were surprisingly easy to remove. More difficult was actually extracting the system from the bike. The downpipes were too snug a fit in the collector box to move in situ so I ended up removing the small crossbar at the front of the frame so I could remove the whole system in one go. Then I was able to wiggle the downpipes out of the collector box fairly easily.  The collector/silencer has surface rust but appeared solid so I attacked it with a wire brush and wire wool.  I found three small holes under one of the brackets so I've treated the whole thing with Krust and I'll bung them up with exhaust putty as I can't stretch to getting it welded at the moment and I suspect the repair will last a long time.


I'll give it a spray with black paint tomorrow (weather permitting) and polish up the downpipes and the heat shield.  I'm feeling pretty pleased, to be honest - I still think I've done pretty well out of the £165 ebay bike.


I'll have to be quite patient with the project bike and just slowly plod on with the things I can do that don't cost anything - but that's plenty to keep me busy and I should have my baby back on the road soon  :D

Ian

  • Full Member
  • ***
  • Posts: 1952
Re: SRX400 projects - progress
« Reply #1 on: August 06, 2013, 10:15:22 PM »
Hazel,
         Well done so far...Lee has done a wondeful job on your tank(s) and other paintwork. If you do need your exhaust welding let me know..I think I may be able to help. (But you will have to be quick!)

Ian :)
1 Speed400 1 C400X -2 thumpers plus one!

guest1378

  • Guest
Re: SRX400 projects - progress
« Reply #2 on: August 07, 2013, 06:12:28 AM »
Thanks Ian, I'll give you a bell later today  :D

guest1378

  • Guest
Re: SRX400 projects - progress
« Reply #3 on: September 01, 2013, 05:15:41 PM »
Thanks for getting my exhaust welded, Ian. I've now painted it black and polished up the downpipes so today I planned to take the exhaust off the no 1 bike so I could fit the refurbed one.  The first nut came off the exhaust stud fairly easily. The second one was missing.  The third one snapped off as soon as I started to gently turn the socket, leaving maybe 15-20mm of stud behind.  The last one wouldn't budge at all so I soaked it in WD40 for ages. After returning to it 2 or 3 times, re-soaking in WD40 and waiting again, it started to turn slowly but steadily.  I was very cautious and gentle but after 2 or 3 turns, that snapped off too, leaving less than 10mm of stud behind.

I've drenched the exhaust studs of both bikes in WD40 and put them back in the shed, thinking I need to proceed with caution.  I'm hoping there's enough of each stud to somehow remove them. Then I'm hoping I can pinch a couple of studs from the donor bike for now.  I noticed that the stud where the nut was missing is bent - are these things particularly poor quality ?

guest295

  • Guest
Re: SRX400 projects - progress
« Reply #4 on: September 02, 2013, 08:00:36 AM »
A common trick is to arc-weld (mig?) a nut to the stump through the hole in the nut. The heat breaks the bond between stud and aluminium, and it will usually come out easily.  Use a new stud, and smear threads you want to undo with anti-sieze goo.

guest1378

  • Guest
Re: SRX400 projects - progress
« Reply #5 on: September 07, 2013, 10:49:50 AM »
Thank you (sorry for delayed response, have had a bad week)

Steve Lake

  • Full Member
  • ***
  • Posts: 2393
  • Dyslexics have more nuf
Re: SRX400 projects - progress
« Reply #6 on: September 09, 2013, 06:46:32 AM »
notorious for this problem... and probably a common problem on a lot of bikes .. a combination of dissimilar metal interaction, high temperature and frequent covering with salty road crud and its no wonder they weld themselves in place... I have had to resort to every trick in the book to resolve this problem. if the welding nut on, fails to do the job.... it may shear off again and now it'll be flush with the head.... then drilling out is the only option... try and drill a small pilot hole through the centre of the stud and then gradually increase drill bit size, its very easy for the bit to drift off into the surrounding material as, being soft alloy it seems to act like a bloody magnet!... then retap the hole... and buy some new studs... readily available from Yamaha and much better than reusing old studs.... I put them in with liberal coatings of copperslip grease.

guest1378

  • Guest
Re: SRX400 projects - progress
« Reply #7 on: September 23, 2013, 06:12:57 PM »
I've been too scared to do anything to it yet !  :-\

themoudie

  • Full Member
  • ***
  • Posts: 4721
Re: SRX400 projects - progress
« Reply #8 on: September 30, 2013, 11:49:13 PM »
Aye sfb,

WARNING: This site can be addictive for tool fetishists! ;)  Left-hand_drills
You might care to make an investment in some of these. Rather than tightening the stud remains, if they become slack when drilling they 'unscrew' when using these drills. Very useful on SRX exhaust studs and other mild steel studs in soft alloy. Centre punch stud well, before drilling and mount casting firmly afore starting to drill. Use stainless steel stud replacements with 'Locktite' when installing studs into the cylinder head and copper grease with brass nuts and washers when securing the exhaust header clamps.

Regards, Bill.

Ian

  • Full Member
  • ***
  • Posts: 1952
Re: SRX400 projects - progress
« Reply #9 on: October 01, 2013, 08:23:41 PM »
Excellent advice Bill, no doubt from many attempts at drilling these things out. I had one that was stuck as probably 90% of them do but in the end I had to take the head off and machine it out on a milling machine and tap it oversize. I realise that this is beyond most peoples reach but it is sometimes the only way left. Sorry I can`t be of much more use.

Ian

1 Speed400 1 C400X -2 thumpers plus one!